
Hello everyone. I have lots to post but it's a little difficult for me to find the time to post them these days. Today, I have some Webster's projects to share with you:)
皆さん、こんにちは!(*^_^*)
今日はWebster's Pagesを使った作品たちのご紹介です☆最近なかなか時間を見つけることができず、まとめてのアップになります(>_<)

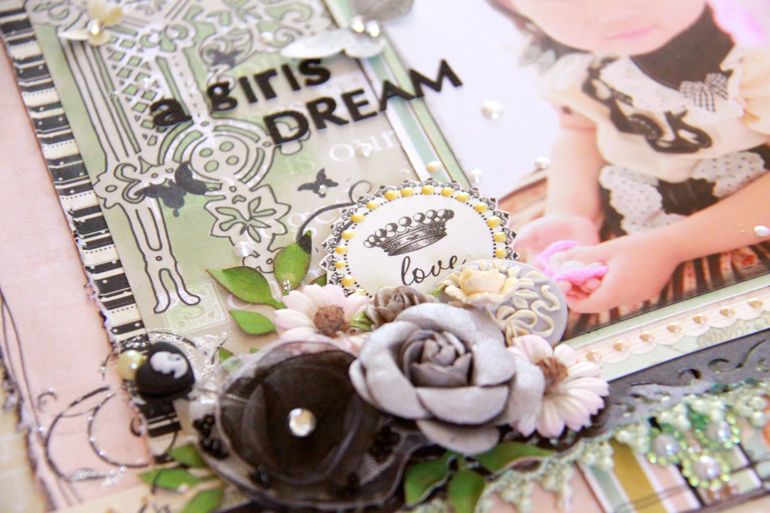
First is this layout made for this month's guest designer scrap lift. This month we have Nic Howard for our guest!! Nic's projects are so amazing and I have been a huge fan of her work!!
Thank you so much for the inspiration. I really enjoyed lifting your work! You can check out her introduction page on inspireME:)
まず最初はこちらのレイアウトです。お友達の写真を使わせていただきました(*^_^*)
今月のゲストデザイナーのスクラップリフト作品です☆今月のゲストはあのNic Howardです!!彼女の作品は本当にどれも素晴らしい(>_<)
ぜひ彼女の紹介ページをご覧になってくださいね☆
inspireME Introducing Nic Howard

Next is this birthday card made for our sweet Brandin! You can also see more inspiring birthday cards here --> Webster's HOME
次はBrandinのために作ったこちらのカードです☆DTのみんなで内緒にBrandinにカードを贈ろうってことになりました(*^_^*)皆さんの素晴らしいカードは上をクリックしていただくと、Webster'sのブログでご覧になっていただけます♪


These are something I made for my daughter's teacher:)
こちらは娘の先生のために作ったちょっとしたミニブックとタグです(*^_^*)ミニブックの中身は先生と園児たちの写真を入れました☆


And this:) This is a train minibook I made with my daughter during spring vacation. She LOVES to scrap, and she always asks my if she can make a card for someone:) She is really good with scissors!! I made a template for this train so you can use it with your kids too!
そして、こちらは春休み中に娘と一緒に作った汽車のアコーディオンミニブックです☆Webster's Pagesからのお題が【子供と一緒にスクラップを楽しむ!】でした(*^_^*)
もともとSB好きな娘なので、夢中になって作ってました☆
テンプレートは自作です(*^皿^*)もしよかったらお子さんと一緒に作ってみて下さいね!B4サイズにすると大体12インチ幅になります(こちらのテンプレートは紙に書いたものを写真に撮って編集したもので、若干のずれが生じるかもしれません)
STEP ONE:
To get things started, copy the train template below. When printed to size B4, it's 12 inches wide (it might not be exactly 12 inch.
ステップ1:まずは下のテンプレートをプリントアウトします(B4サイズにコピーすると、大体12インチ幅になります)

STEP TWO:
Trace the template onto any Webster's Pages patterned paper.
ステップ2:
テンプレートを切り抜き、パターンペーパーに型を取りカットアウトします。

STEP THREE:
Have your ridiculously adorable helper cut it out. {Admire him/ her. Squeeze his/ her cheeks. Snap a photo.}
ステップ3:
お子さんにカットしてもらいましょう♪

STEP FOUR:
Cut out the small parts from the train like so:
ステップ4:
小さなパーツをカットします。小さなタイヤは14個切り抜きます。

STEP FIVE:
Cut out small tires and details from the train and use them as templates on complementary patterned papers. Cut these out and adhere on your patterned train.
ステップ5:
パーツを土台に貼ります。後ろ側にもタイヤを貼りましょう。

STEP SIX:
Embellish! My daughter added Perfect Accents and Medallion Sparklers to their wheels for a little added pizzaz! And the best part is that any of these steps could be done by small hands!
ステップ6:
飾り付けです!ご自由に飾って下さいね(*^_^*)


STEP SEVEN:
Allow your child(ren) to decorate the pages or add photos to the inside to complete your album.
ステップ7:
中身はお写真入れたり、お絵かきします♪

Template

Hope you enjoy!!! :D
And lastly, this is my blueprints sent from Webster's. I am so not good with journals but this will be a wonderful keepsake for me and my daughter:)
最後に私もWebstersからBlueprintsが届きました。普段は自分の気持ちを文章に表すのは本当に苦手なのですが、これはがんばって書こうと思います(*^_^*)
中は娘が生まれたときの写真とか、手形とか入れてます♪


Thank you so much for dropping by!
今日もご訪問いただきありがとうござます!
3 comments:
These are all such lovely new WP projects, Tomoko! My favorite is the train-card idea...love that you had a little helper, what a great idea and great resulting card!
Love the idea of making a train mini book with kids. I will definately give this a go. ( will definately not forget taking a pic or two):P
Thank you for sharing and the template !!
Fabulous as always, Tomoko! Looks like your little girl will be following in mommy's footsteps!
Post a Comment