Showing posts with label Projects 2011. Show all posts

2011-12-20

Published in Love My Memories

Just a quick post today:) I was published in Love My Memories vol. 15!! 
Here are the creations that were published....

皆さん、こんばんは☆
ラブメモ15号発売されましたね!!!私の作品も2作品掲載していただきました(*^_^*)
こちらがその2作品です。


Webster's PagesのWinter Fairy Talesコレクションを使用した12インチ作品。

 Snowy Day


そして、娘の大好きなものをまとめた春らしいミニブックです☆
Love 〜Document Everyday Life


Thank you so much Love My Memories for publishing my work!!!

今回もたくさんテクニックのご紹介があって見応えある雑誌になってますね!
まだご覧になってない方はぜひ手にとってみてください(*^_^*)

ありがとうございました☆

2011-12-17

Imaginarium Designs Halloween Minibook


I know I'm a little late to show you this.... lol
Halloween pasted a while ago! lol But, I am so happy that I finally finished this book and can share this with you:) Hope you like it! (A little tip inside)

皆さん、こんにちは☆
ちょっと時期外れのミニブックですが、やっと完成したので公開できて嬉しいです(*^_^*)
実はこのミニブック、ちびちび作ったせいか1ヶ月以上かかってしまいました(汗)でも、楽しかったハロウィーンの思い出、こうやってミニブックに残せて良かったです(*^_^*)

では、さっそくご紹介です☆
せっかくなので動画も作りましたので、よかったら見てください☆(最後に簡単なチップボードの着色方法をご紹介させていただきます☆)


Here are some stills of this minibook.
ミニブックの画像はこちらです(*^_^*)


Some of these charm are from Bo Bunny (one with Dorothy inside and the one hanging from that charm). I just love them!!

ドロシーが入ってるチャームとそのチャームにぶら下がってるチャームは共にBo Bunnyからです☆中の絵柄をドロシーに変えました(*^皿^*)


Special Credit (Brush): Webster(S Pages Digital

And here is a little tip on how I detailed the Imaginarium Designs fence chipboard. 

そして、こちらは簡単なチップボードの着色方法です☆Imaginarium Designsのフェンス型チップボードを使用してます。

☆使用しているペーパー(Graphic45)はボールドでヴィンテージなデザインなので、チップボードやペーパーは「ちょっと汚いかもー!」ぐらいがちょうどいいと思います(*^_^*)インクのムラなどはいい味を出してくれます♪

1. Use a sponge to paint the chipboard (I used Tail Tan from Delta Ceramcoart). 
1. スポンジを使い、アクリル絵の具をチップボードに塗ります(Delta Ceramcoat Trail Tan使用)(あ、以下はG45のペーパーの上で着色してません〜。ちゃんとビニールの上ですよ〜(*^皿^*))


2. Spray mist on the upper chipboard (Maya Road Metallic Mist)
2. ミストをチップボードの上部分にふりかけます(Maya Road Metallic Mist使用)


3. Apply Glossy or Crackle Accents on the upper chipboard (apply when the mist is still wet).
3. ミストが乾かない内に、グロッシーアクセントもしくはクラックルアクセントをチップボードの上部分に塗ります。


4. Put some texture with your finger. (mix the crackle accent and mist together and make the surface irregular)
4. ミストがムラになるように、指で馴染ませ、テクスチャー(凹凸になるように)をつけます。


5. After the the Crackle Accent dries, apply brown ink on the top and bottom of the chipboard with a sponge (I used 2 colors of brown)
5. クラックルアクセントが乾いたら、スポンジを使い茶色のインクでチップボードの上部分を着色します(直接DTPしてもOKです☆)。また下部分も茶色のインクで着色します。(以下の写真では上下、異なった茶色のインクを使用してます)


6. Add stamp to some parts.
6. スタンプを部分的に押します(Tim Holtz使用)


7. Dab paint with Gold Acrylic Dabber on some parts of the bottom chipboard.
7. ゴールドのアクリルダバー(Ranger Ink)を使い、下部分を疎らに着色します。


8. Apply some more Crackle paint if you want some more crack effects.
8. クラックル(割れ)効果が足りない場合は、さらにクラックルアクセントを塗ります。


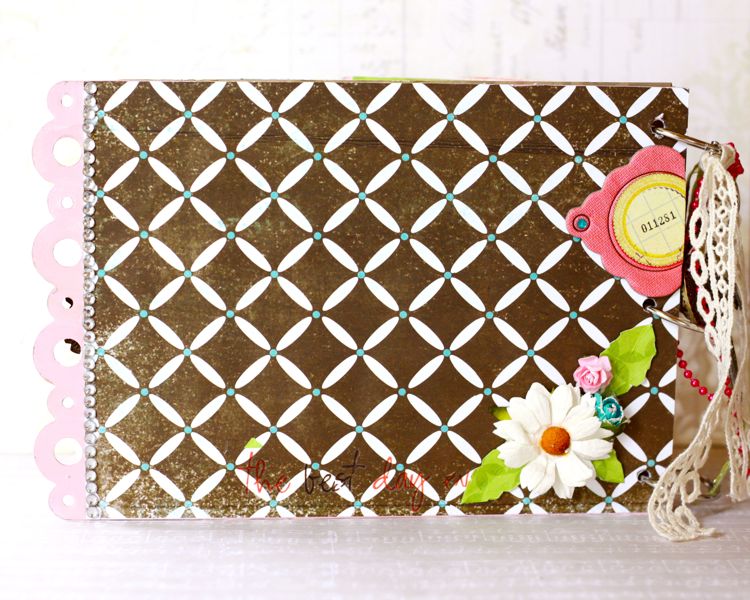
Here's how the chipboard will look like:) On the chipboard below, I used some black ink too.
仕上がりイメージはこんな感じです☆(ミニブックのサンプルでは部分的に黒のインクも使用してます)


Hope you'll try it:) 
よかったら、ぜひ試してみてくださいね☆

And don't forget to leave your comment on Imaginarium Designs blog to win some lovely Imaginarium Designs chipboards!!! 
そして、IDのブログにはぜひコメントを残してくださいね!抽選でIDのチップボードが当たります♪

Thank you so much for taking your time to visit my blog and for the blog love:)
Hope you have a wonderful day! hugs!! 

ご訪問いただきありがとうございました☆

2011-12-12

SB Shop Palette - Samples (with yummy supplies!)


Hello everyone! Today I would like to show you some samples I made for a scrapbook store in Japan, SB Shop Palette!! The store owner, Chie is such a generous and wonderful person so I was very very happy and pleased to make these samples for her:) Thank you Chie-san for everything you do for me:)

皆さん、こんにちは☆
今日はいつもお世話になってる【SB Shop Palette】さんのために作ったサンプルたちのご紹介です(*^_^*)オーナーの奧野さん、すっごくいい人で大好きなんです(>_<)☆
いつもいつもありがとうございます!そして今回このような機会を下さり、本当に嬉しかったです。

では、さっそくサンプルのご紹介です☆
ダイカット作品、ミニブック、タグをそれぞれ1点ずつ作らせていただきました(*^_^*)


Here is my first sample. Using a die-cut from Kaisercraft. To strengthen this die-cut, I glued a plastic sheet under it. The flowers around the die-cuts are all made out of sizzix die cut flowers. Aren't these flowers cute? :)

まずは、ダイカットを使ったこちらの作品です。
土台強化のために裏に12インチのクリアプラスチックシートを貼ってから、縁に添ってカットしました☆


Some close ups as usual:) I just love this adorable birdie resin from Prima!!
クローズアップです。
レジンの鳥さん、とっても可愛いですね(*^_^*)


ダイカットの周りにあるお花たちは全てダイで抜いたものです☆
このお花は小ぶりでとっても使いやすいんです!Tim Holtzのダイももってますが、あちらは1つでもすっごくインパクトありますよね!こちらの小ぶりなタイプはインパクトが強すぎず、既製のフラワーの横にたくさん足すとより作品が繊細になって、すごくおすすめです♪ダイカットをあまり使用しない私でもはまりそう(*^皿^*)♪


Look at all the flowers I made out of the die cut:D (I will show you how I made these below)

この作品のために、たっくさんお花を作りました♪(作り方のご紹介は一番下です☆)


Next is this minibook. The colors used are about the sample. Just added a little pink to it to make it more lovely:)
次はこちらのミニブックです♪
ダイカット作品と色合いが似てますが、ピンクを足すことによってよりラブリーな雰囲気に仕上げました☆


I used the die cut leaves for this album too. They are very useful and so pretty to add between your flowers!
こちらではダイカットの葉っぱを使用しました(*^_^*)


Last is a little tag I made for a friend.

最後はこちらのタグです☆
Pink Paisleeから出てるMistablesを使用してます♪


And here are some tips on these smaples:) Hope you like them!

では、簡単なチップのご紹介です(*^_^*)

Detailing Mistables

Use distress ink and rub it on to the mistables (use 2 colors or more).
まずはDistress Inkを使い(2色以上)、スポンジでグラデーションに塗ります(こする感じで塗ります)。

Mist some Shimmerz to some parts.
より馴染ませるために、ミストを部分的にふりかけます(使用ミスト:Shimmerz Vibez)

Wipe off the extra mist with tissue paper.
余分な水分はティッシュで拭き取ります。


Flowers

Die cut 3 little flowers in different size.
ダイでお花を抜きます。

Curl up the petals with your fingers like the picture below.
写真のように、指で花びらを丸めます。

Glue the 3 flowers together and add liquid pearl to the center.
3枚のお花を重ねてのり付けしたら、中心にリキッドパールをのせます。

Add rhinestone on top of the liquid pearl (before liquid pearl dries).
最後にリキッドパールが乾かない内に、ラインストーンをのせて、完成です♪

Leaves

To make a 3D effect, just fold the sides of the leaves like the picture below.
葉っぱをより立体にするために、指でそれぞれの葉っぱを内側に折り目をつけます。

Use a sponge to ink the edges of the leaves and your finished!
葉っぱの先の部分に、スポンジを使い着色します。

以上です(*^_^*)

ぜひぜひトライしてみてくださいね!

【材料リスト】Supply list
***ダイカット作品***

ペーパー:Kaisercraft Madam Boutique (Die-cut PaperDouble-side Paper)Ruby Rock-It(Avalon Double Sided Cardstock
フラワーに使用したペーパー:Ruby Rock-It (Christmas Cheer Double-Sided Cardstock Sentiments Journaling Cards
葉っぱに使用したペーパー:Ruby Rock-It (Christmas Cheer Double-Sided Cardstock Christmas Tree)、その他
レジン:Prima(Small Sparrows
バナー:Melissa Frances(Deck The Halls Cardstock Holiday Banners
パール:Ruby Rock-It (Wedding Self-Adhesive Pearls With Rims 20/Pkg White With Gold*N
フローリッシュ・タイトル:近日発売予定
ダイ(フラワー、葉っぱ):Sizzix (Sizzlits Die Set 3/Pkg Flowers, Branches & Leaves
ラブオン:Kaisercraft (Bonjour Brown Rub-Ons


***ミニブック***


ペーパー:Ruby Rock-It (Avalon Double-Sided Cardstock FantasyVision)My Minds Eye(Love Me Double-Sided Paper DoiliesPlaidDoily Banners
葉っぱに使用したペーパー:Ruby Rock-It (Christmas Cheer Double-Sided Cardstock Christmas Tree
バナー:Melissa Frances(Deck The Halls Cardstock Holiday Banners
ダイ(葉っぱ):Sizzix (Sizzlits Die Set 3/Pkg Flowers, Branches & Leaves
ラブオン:Kaisercraft (Bonjour Brown Rub-Ons
Mistables:Pink Paislee Mistables Fuzzy Sticker、 Journal Tags 10/Pkg W/Resist Front

***タグ***

葉っぱに使用したペーパー:Ruby Rock-It (Christmas Cheer Double-Sided Cardstock Christmas Tree
ダイ(葉っぱ):Sizzix (Sizzlits Die Set 3/Pkg Flowers, Branches & Leaves
ラブオン:Kaisercraft (Bonjour Brown Rub-Ons

その他今週発売されるものもたくさんありますので、ぜひショップをのぞいてみて下さいね!!(*^▽^*)
ご訪問いただき、ありがとうございました☆

Thank you so much for dropping by and have a lovely day!!